Tabs In Word 2010
Tabs in Microsoft Word are the source of much confusion for many users. However, using them can give you a great deal of flexibility when laying out your document for maximum readability. To use tabs effectively, it’s important to understand the basics before you make a hash of things! Read on…
Many people press the space bar several times to indent text. Whatever you do, don’t do that! If you do that on several lines of text, the odds of getting your text to line up properly are pretty slim. A better way is to set tabs.
Without any tabs added to a document, each press of the tab key moves the cursor along by one inch. This might suit your needs in a few cases, but probably won’t in most. It’s usually better to specify precisely where you want your text to start after you press the tab key, so you get the layout you want.
When setting tabs, you’ll need to display the ruler along the top edge of your document. It is on the ruler that you will be setting tabs. If you can’t see a ruler running acros the top of your workspace, click View > Show > Ruler (ensure that that box is checked).
To the far left of the ruler, you should see the tab selector button. By default, it will initially look like an ‘L’. This button controls what kind of tab you will set when you click on the ruler. Hovering over the tab selector will display the current tab type in a tooltip. There are several different tab types available to us, and we can change to the next one by clicking the selector button. The tab type selection cycles round in the following sequence:
| Symbol | Tab Type |
|---|---|
| Left Tab | |
| Centre Tab | |
| Right Tab | |
| Decimal Tab | |
| Bar Tab | |
| First Line Indent | |
| Hanging Indent |
Tabs don’t just set the location that text is displayed. They also set the text alignment. The most popular tab is the left tab, and that creates left aligned text. Centre and right tabs produce centre and right aligned text, which is pretty straightforward.
Inserting A Tab Stop
Inserting a tab stop is as easy as clicking on the ruler. Ensure that you have the tab type set correctly on the tab selector (far left) and then just click on the ruler. You can add as many tabs as you want to the ruler: just point and click. Now when you press the tab key, the cursor will jump to the next tab.
It’s important to remember that the tabs you set affect only the paragraph where the cursor is, or the paragraphs you select when you set the tabs. If you set tabs only in the first paragraph, for example, they won’t affect the text in any other paragraph.
Tabs In Action
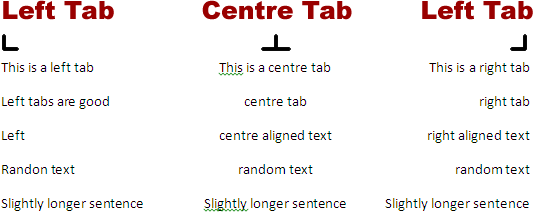
Let’s add some tabs, and see how our text reacts to them. The following image shows how the left tab, centre tab and right tab work:
You can see that text underneath the left tab is left aligned to the vertical line running underneath that tab. It’s a similar story with the other tabs.
Here is how the decimal tab works. Note that the decimal points are all lined up to an imaginary vertical line running directly below the tab stop:
The numbers to the right and left of the decimal point may not line up, but the decimal points themselves are all ligned up.
A bar tab doesn’t actually position the text you type, it merely inserts a vertical bar at the tab position. The careful use of bar tabs can make your content a bit easier to understand. For example, you could add a bar tab to the above document to get the following:
The first line indent tab refers to the indent that is applied to the first line of text in a paragraph. For each paragraph, there can only be one first line indent tab (because there’s only one first line!). There are two ways to add this kind of tab stop: you can set the tab selector to first line indent and click once on the ruler, or you can drag the first line indent tab that’s already there to where you want it. By default, every new document has a first line indent tab set against the left margin.
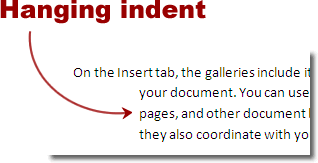
A hanging indent refers to the indent applied to all but the first line of text in a paragraph. Setting the hanging indent tab is performed in exactly the same way as setting the first line indent tab. Unlike other tabs, once set, the first line and hanging indents are applied automatically to text as it is typed. You don’t need to press the tab key.
Removing Tabs
Removing tabs is very easy – just click and drag them off the ruler. To remove all tabs, double click on one of the tab stops and click Clear All in the Tabs window.


